Strip, match, and splice car and stereo wires using connectors, solder, and a multimeter to confirm each circuit.
I’ve installed dozens of car stereos without a factory wiring harness, and this guide shows you how to install car stereo without wiring harness with clear steps, real tips, and safety checks. You’ll get simple wiring basics, tools, step-by-step instructions, troubleshooting, and honest trade-offs so you can finish a clean, reliable stereo swap that sounds great and won’t short your car electrical system. Read on to learn the exact process, common pitfalls, and when to choose a harness instead.
:max_bytes(150000):strip_icc()/GettyImages-570258697-56a1051b3df78cafdaa7eeca.jpg)
Tools and materials you’ll need
A tidy tool kit makes installing a stereo without a wiring harness faster and safer. Here’s what I use every time.
- Wire strippers and cutters — sized for 18–12 AWG wires.
- Soldering iron or crimping tool with quality insulated butt connectors.
- Heat-shrink tubing or electrical tape to seal splices.
- Multimeter to test voltage, continuity, and ground.
- Small screwdrivers and panel trim tools to remove dash panels.
- Wiring diagram or color chart for your car and the aftermarket stereo.
- Inline fuse holder or spare fuse matched to your stereo’s manual.
- Antenna adapter and any steering wheel control interface if needed.
- Zip ties to secure wiring and keep everything tidy.

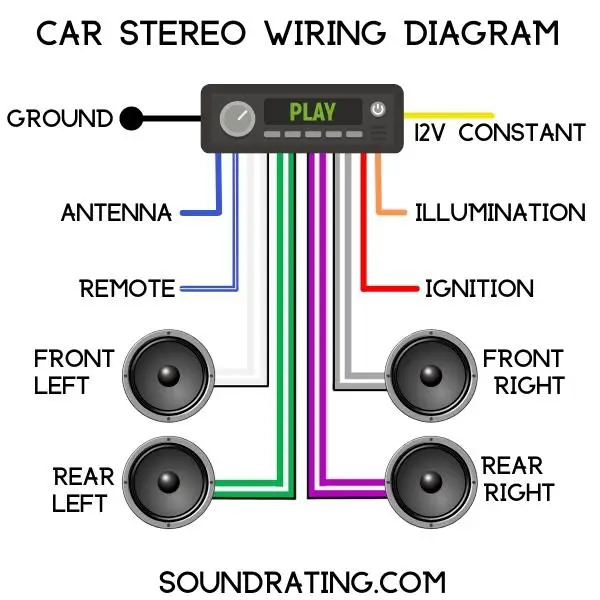
Understand car and stereo wiring basics
Before you splice wires, know what each wire does. This prevents blown fuses and bad sound.
- Constant 12V (battery) — keeps memory for clock and presets.
- Switched 12V (accessory) — turns the stereo on with ignition.
- Ground — vehicle chassis or ground wire connection.
- Speaker wires — usually in pairs for left/right front and rear.
- Remote turn-on — used for amplifiers or powered subwoofers.
- Illumination/dimmer and antenna power — used on some radios.
Car and stereo color codes often match, but they can vary by model. Always test wires with a multimeter. Finding steady 12V means battery. Switched 12V shows 0V with ignition off and 12V when on. Ground should show near 0 ohms to chassis.

Step-by-step: how to install car stereo without wiring harness
This section walks through the full install. Follow each short step and test before final assembly.
- Prepare and document
- Disconnect the car battery negative terminal to avoid shorts.
- Remove the dash trim and old stereo carefully, noting any screws or clips.
- Take photos of factory connectors and wire entrances for reference.
- Identify wires and test
- Use a multimeter to find constant 12V, switched 12V, and ground.
- Identify speaker wires by checking continuity to speaker terminals.
- Label each wire with tape to avoid confusion.
- Decide splice method
- Crimp connectors are quick and reliable when done right.
- Solder and heat-shrink tubing give the smallest, most durable joints.
- For temporary installs, use insulated butt connectors, but plan for a permanent fix later.
- Match wires and connect
- Match speaker positive to positive and negative to negative from stereo to car.
- Connect constant 12V to memory/battery input and switched 12V to accessory.
- Connect remote turn-on only if you use an amp or powered antenna.
- Ensure ground is connected to a clean metal spot or ground wire.
- Protect and secure connections
* Slide heat-shrink over soldered joints; shrink with a heat gun.
- Use zip ties to bundle wires and keep them away from moving parts or HVAC ducts.
- Replace dashboard trim loosely and test all functions before final reassembly.
- Power-up and test
- Reconnect the battery negative terminal.
- Turn key to accessory and power the stereo on.
- Check radio, CD/USB/Bluetooth functions, speaker sound in all channels, and any steering wheel controls.
- If the stereo won’t turn on, re-check switched vs constant 12V and fuses.
- Final assembly
- Once everything works, secure the head unit and reassemble dash panels.
- Keep any extra wiring tucked and labeled for future service.
Common problems and troubleshooting
When you install car stereo without wiring harness, issues can pop up. Here are fast fixes.
- No power — check battery connection, fuses, and switched 12V input with a multimeter.
- Sound only from one side — confirm speaker polarity, and check speaker wire continuity.
- Constant blowing fuses — inspect for short to chassis on power wires or incorrect ground.
- Stereo resets or loses memory — constant 12V may be tied with switched 12V; locate true battery feed.
- Static or poor sound — ensure solid grounds and shielded RCA runs for amps.
For tricky wiring, tracing the factory harness with a wiring diagram or repair manual saves time. If wires look corroded, clean or replace them. Never guess which wire is which without testing.

Alternatives and when to choose a wiring harness
You don’t always have to splice. Consider these alternatives and when they make sense.
- Buy a vehicle-specific wiring harness adapter — fastest and cleanest option.
- Use a factory-to-aftermarket harness to preserve steering controls and airbags.
- Install a universal ISO harness if your car supports it.
- Hire a pro installer for modern cars with complex CAN-BUS systems or advanced features.
If you want reversibility, minimal dash trimming, and preserved factory features, get a harness adapter. If you enjoy DIY and your car wiring is simple, direct splicing can work fine.
Safety tips and best practices
Working without a harness means extra care. Follow these safety steps.
- Always disconnect the negative battery terminal before cutting wires.
- Use proper insulation and heat-shrink over every connection.
- Match wire gauge and fuse rating to the stereo manufacturer’s specs.
- Avoid routing wires near sharp edges or hot surfaces.
- Keep a digital copy or photos of wiring for future repairs.
Safety protects your car and your investment. Faulty wiring can damage modules or create fire hazards. When in doubt, stop and get professional help.
Personal experience, mistakes to avoid, and pro tips
I’ve wired many head units without harnesses. Here are practical lessons from real jobs.
- Lesson: Label everything. I once swapped two speaker wires and spent an hour troubleshooting a left/right swap.
- Mistake to avoid: assuming colors match. Test, don’t guess. Colors can change across years and regions.
- Pro tip: use a small inline fuse near the battery for any added accessories. It saved me once when a loose wire shorted.
- Tip: keep spare butt connectors and heat-shrink in the glove box. Quick fixes are easier with the right parts.
- When steering wheel controls are important, get the control interface before cutting wires.
These small habits make installs cleaner, faster, and less stressful.

Frequently Asked Questions of how to install car stereo without wiring harness
What is the easiest way to install a car stereo without a wiring harness?
Use quality crimp connectors or solder joints and label wires. Test key circuits with a multimeter before finalizing the install.
Can I match wires by color without testing?
No. Car and aftermarket wire colors often differ. Always confirm constant 12V, switched 12V, and speaker wires with a meter.
Is it safe to solder all connections when installing a stereo?
Yes. Soldered connections sealed with heat-shrink are durable and low-resistance. Just avoid cold solder joints and protect joints from vibration.
Do I need an inline fuse when splicing power wires?
Yes. Add an inline fuse or ensure the stereo input uses the correct fuse rating. This protects wiring from shorts and prevents fire risk.
Will splicing void my car warranty or cause issues?
Minor wiring typically won’t affect warranty unless it damages factory modules. Keep splices tidy and reversible if possible to reduce risk.
How do I preserve steering wheel controls without a harness?
Purchase a steering control adapter designed for your vehicle and the stereo model. These adapters translate signals and avoid cutting factory wires.
Conclusion
You can successfully learn how to install car stereo without wiring harness by testing each wire, using proper tools, and protecting every splice. Follow the steps, keep safety first, and choose solder or quality crimping for strong connections. If you want a faster, cleaner job with full feature retention, consider a vehicle-specific harness adapter or a professional installer. Try the process on a simple car first, take photos as you go, and share your results or questions below—I'd love to hear about your build and help troubleshoot.


