Installing car stereo wiring is simple when you follow clear steps and use the right tools.
I have installed dozens of systems and written wiring guides for years, so I know what works. This article walks you through how to install car stereo wiring from prep to testing. Read on for clear steps, safety tips, and real-world fixes that make the job smooth and repeatable.
Tools and materials needed
Gathering the right tools saves time and keeps wiring neat. Below is a compact kit that covers most installs.
- Wire harness adapter specific to your vehicle, to avoid cutting factory wires.
- Wire stripper, crimper, and a basic soldering iron for solid connections.
- Heat shrink tubing and electrical tape for insulation and protection.
- Multimeter to test voltage, continuity, and ground connections.
- Panel tools to remove trim without damage, and screwdrivers to fit the head unit.
- Butt connectors or solder and flux for joining wires; zip ties for neat routing.

Source: amazon.com
Understanding car wiring basics
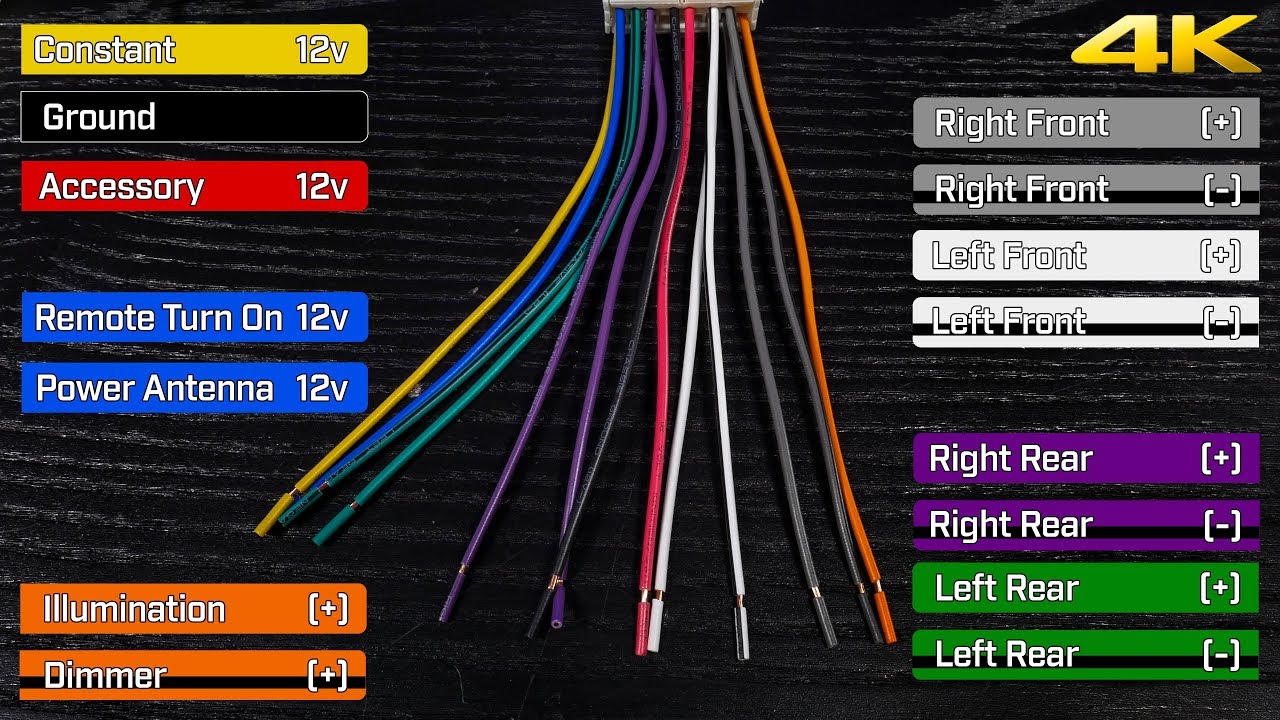
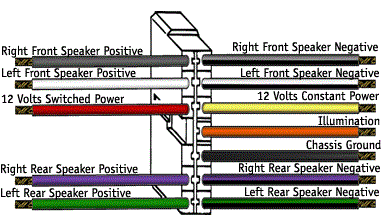
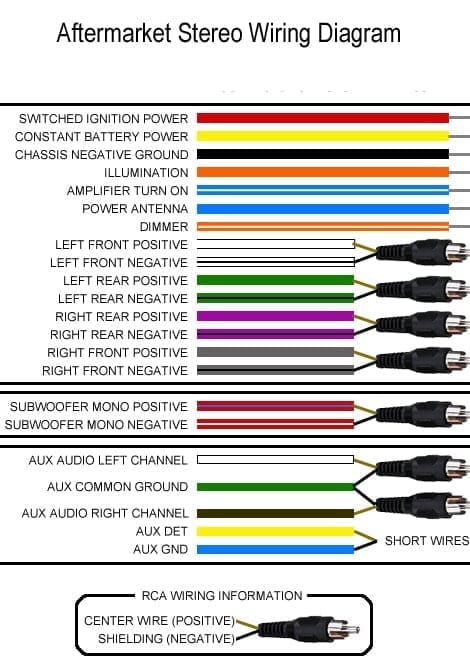
A short wiring primer lets you read color codes and know what each wire does. This helps you avoid mistakes when you learn how to install car stereo wiring.
- Constant 12V (battery) — powers memory functions like clock and presets.
- Switched 12V (ignition/accessory) — powers the radio only when the key is on.
- Ground — chassis ground that completes the electrical circuit.
- Speaker wires — usually in pairs per speaker with a color and a color/stripe.
- Remote turn-on — a small blue or blue/white wire that tells amplifiers to power up.
- RCA outputs — carry low-level audio to external amps and need proper routing to avoid noise.
Source: youtube.com
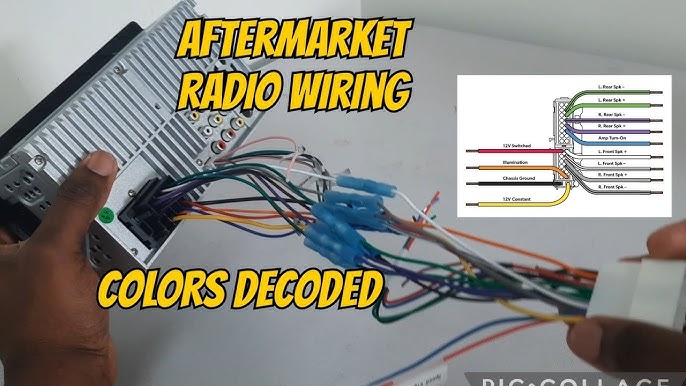
Step-by-step guide to how to install car stereo wiring
Follow these ordered steps to complete a reliable install. Read each step before you act.
- Disconnect the negative battery terminal to prevent shorts or shocks.
- Remove trim and unscrew the factory head unit using panel tools.
- Unplug the factory connector and antenna cable from the old unit.
- Inspect the harness. If you have a factory harness adapter, plug it into the car connector.
- Match wires from the aftermarket harness to the adapter by color and function.
- Join wires using crimp connectors or solder for a permanent link. Use heat shrink over connections.
- Connect constant 12V and switched 12V to the correct wires. Secure the ground to bare metal.
- Attach speaker wires, keeping polarity consistent (positive to positive, negative to negative).
- Connect RCA cables and remote turn-on for amplifiers if needed, routing them away from power cables.
- Reconnect the negative battery terminal. Turn the key on and test radio power, memory, and speaker output.
- If everything works, tuck wires, zip tie bundles, and reassemble the dash trim.
- Final test at varied volumes and settings to confirm no noise or distortion.
Source: crutchfield.com
Best practices for connections and safety
Good habits prevent headaches and protect your car. I learned this after fixing poor installs twice.
- Use a harness adapter to avoid cutting factory wires and to keep resale value.
- Prefer soldered joints or high-quality crimp connectors; cheap connectors can fail.
- Always insulate exposed metal with heat shrink to prevent shorts.
- Keep RCA and speaker wires separate from power cables to reduce hum.
- Replace blown fuses with the correct rating and never bypass a fuse.

Source: youtube.com
Troubleshooting common wiring problems
If things don’t work, the problem is often one of a few common issues. These quick checks often fix the issue fast.
- No power: Confirm the battery terminal is tight and check both constant and switched 12V with a multimeter.
- Unit powers on but no sound: Verify speaker wires are connected and polarity is correct; check speaker fuses.
- Constant static or hum: Re-route RCA cables away from power wires and check ground connections.
- Unit resets or loses memory: Ensure the constant 12V is connected and not tied to an accessory circuit.
- Remote turn-on not working: Check the blue remote wire and amplifier connections for continuity.
Source: caraudionow.com
Advanced topics and special cases
Some cars require extra steps. These tips help when standard methods don’t apply.
- Factory amplifiers often require a line output converter or a specific adapter to use the factory amp.
- Vehicles with CAN bus may need a module to retain steering wheel controls and proper power signaling.
- Hybrid and electric vehicles can have different battery locations and electrical quirks; consult the service manual.
- Retaining steering wheel controls usually needs a small adapter that connects to the car’s control bus.
- When upgrading to high-powered amps, upgrade ground points and consider a second battery or capacitor for steady voltage.

Source: youtube.com
Personal tips and mistakes to avoid
I once wired a head unit without testing the harness adapter and had to redo the dash work. Learn from that.
- Label each wire with tape before disconnecting. It saves time and prevents guesswork.
- Test all functions before reassembling the dash. It is easier to fix issues with parts exposed.
- Avoid over-tightening screws that hold the radio cage. Stripped threads are hard to fix.
- Keep spare fuses and a small roll of tape in your glovebox after an install for quick fixes.

Source: ebay.com
Frequently Asked Questions of how to install car stereo wiring
How long does it take to install a car stereo wiring harness?
Most installs take between one and three hours depending on dash complexity and whether a harness adapter is used. Simple installs on older cars often finish in under two hours.
Do I need to cut factory wires to install an aftermarket stereo?
No, you do not need to cut factory wires if you use a vehicle-specific harness adapter. Using an adapter preserves the factory wiring and makes future changes easier.
Can I solder connections inside the dash?
Yes, solder is preferred for permanent, low-resistance connections, but be sure to insulate with heat shrink. Work safely to avoid heat damage to plastic trim.
Why does my stereo hum after installation?
A hum often comes from poor grounding or RCA cables routed near power wires. Re-check the ground and reroute RCA cables away from the main harness to reduce noise.
How do I keep steering wheel controls working?
You typically need a steering wheel control adapter that matches your vehicle and new head unit; follow the adapter’s wiring guide. This preserves functionality without complex coding.
Is it safe to install the wiring myself?
Yes, with proper tools, a wiring adapter, and by disconnecting the battery, most DIY installs are safe. Complex vehicles or factory amplifiers may still require a pro for best results.
Conclusion
You can confidently handle how to install car stereo wiring by following clear steps, using a harness adapter, and testing carefully. Start with the right tools, label wires, and choose solid connections for long-term reliability. Try a small install this weekend, and share your results or questions below — I’d love to help you troubleshoot or celebrate the finish.
