Wire a car stereo by matching power, ground, speaker, and accessory wires to the vehicle harness.
I’ve wired dozens of car stereos and taught others how to do it safely and cleanly. This guide explains how to wire a car stereo step by step, from tools and wire colors to speaker hookups and troubleshooting. Read on to learn clear, practical steps you can use today to install or replace a car stereo with confidence.
Tools and materials you’ll need
Start with the right tools. Good tools make wiring fast and safe.
- Basic tools: screwdriver set, panel pry tools, socket wrench, wire stripper, crimping tool.
- Electrical items: wiring harness adapter, crimp connectors, butt connectors, heat-shrink tubing, solder and flux (optional).
- Safety and testing: multimeter, fuse puller, inline fuse (if adding battery lead), electrical tape.
- Extras: zip ties, foam tape, mounting kit for your dash, RCA cables for amplifiers.
Choose a factory-compatible wiring harness adapter when possible. It saves time and keeps the factory wiring intact.

Understand car stereo wiring basics
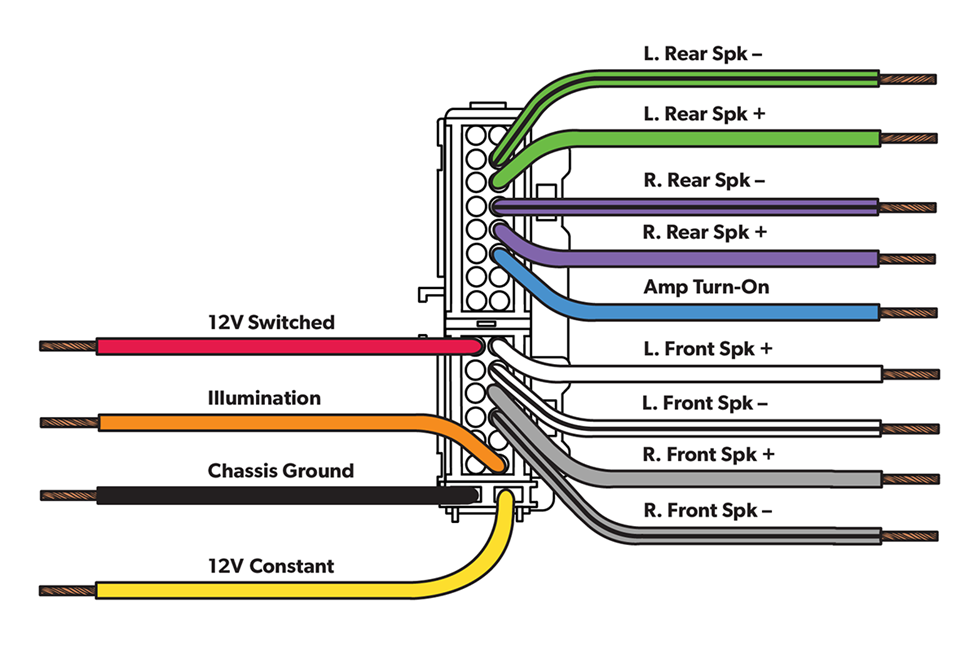
A clear grasp of wiring basics makes installation simpler and safer. Here are the common wires and their roles.
- Constant 12V (battery) — keeps memory settings and clock alive.
- Switched 12V (accessory) — powers the radio when key is on.
- Ground — completes the electrical circuit.
- Remote turn-on — tells an amp or powered sub to turn on.
- Speaker wires — usually in pairs for each speaker, with one positive and one negative.
- RCA outputs — low-level signals to feed external amplifiers.
Most aftermarket harnesses follow common color codes. Still, always verify with a multimeter or the harness guide. Knowing how to wire a car stereo means you can reduce mistakes and get clean audio fast.
What color is constant power typically?
Constant power is usually yellow on aftermarket head units. Use a multimeter to confirm at the harness if unsure.
How do I tell switched power from constant power?
Switched power (often red) shows 12V only when the ignition is on, while constant power (often yellow) shows 12V always. Test with a multimeter to be sure.
Step-by-step guide: how to wire a car stereo
Follow these steps in order. Read each step before you start working.
- Disconnect the negative battery terminal. This prevents shorts and sparks.
- Remove trim panels and the old head unit carefully with pry tools. Keep screws and clips organized.
- Unplug the factory harness and antenna. Take photos so you remember placement.
- Attach the aftermarket wiring harness adapter to the factory plug. Match colors and functions.
- Connect the adapter to the stereo harness. Use crimp connectors or solder and heat-shrink for stronger joints.
- Hook up power wires: yellow to constant 12V, red to switched 12V, and black to ground. Double-check with a multimeter.
- Connect speaker wires: match positive and negative pairs. Keep left/right and front/rear straight.
- Connect remote turn-on (blue/white) if you have an external amp or powered sub.
- Reconnect the negative battery terminal and test the stereo before final mounting. Check power, sound to each speaker, and amp turn-on.
- Secure the head unit in the dash, replace trim, and tidy wiring with zip ties.
From my experience, taking photos at the start saves time. I once spent an hour undoing a wiring mix-up because I skipped photos. Label wires if you work slowly.
Connecting speakers, amplifiers, and subwoofers
Proper speaker and amp connections improve sound and prevent damage.
- Speaker wiring: keep polarity correct; positive to positive, negative to negative. Reversed polarity causes weak bass and phase issues.
- Impedance: match speaker impedance to amp specs. Avoid bridging an amp to a speaker unless the amp supports it.
- RCA cables: run RCAs on the opposite side of power wires to reduce noise. Use quality, shielded RCAs.
- Speaker-level inputs: if head unit has no RCAs, use speaker-to-RCA converters or an amp with speaker-level inputs.
- Remote turn-on: connect blue or blue/white wire from head unit to amp remote terminal for synchronized power.
A common mistake is running RCAs next to a power cable. I learned that the hard way—my amp had a hum until I rerouted the wires.

Troubleshooting common wiring problems
If something goes wrong, methodical checks fix most issues quickly.
- No power: check battery connection, fuses in the dash and inline fuses, and wiring harness connections.
- No sound from one speaker: test speaker wiring polarity and connector seating. Swap speaker outputs to isolate a bad speaker.
- Blown fuses: likely short to ground or reversed power/ground. Recheck wiring and use the correct fuse rating.
- Radio powers on but amp won’t: verify remote turn-on wire and ground for the amp.
- Ground loop hum: ensure a single solid ground and separate signal cables from power wires.
Use the multimeter often. It will save time and prevent replacing parts you don’t need.
Safety tips and best practices
Safety keeps you and your car protected. Follow these simple rules.
- Always disconnect the negative battery terminal before wiring.
- Use an inline fuse near the battery for any new battery-fed power runs.
- Secure wires away from moving parts and sharp metal edges. Use grommets where wires pass through metal.
- Use proper connectors, heat-shrink, or soldered joints instead of loose-twist connections.
- Test before final assembly. Confirm all functions work before putting panels back.
I once forgot an inline fuse on a custom battery lead. The first short fried a connector and cost more time. Don’t skip fuses.

Frequently Asked Questions of how to wire a car stereo
What tools do I need to wire a car stereo?
You need a wiring harness adapter, wire strippers, crimping tool, multimeter, and basic hand tools. Optional items are solder and heat-shrink tubing for stronger connections.
How do I know which wire is ground?
Ground is usually black on aftermarket head units and attaches to the car chassis. Use a multimeter to verify continuity to the vehicle body if unsure.
Can I wire a stereo without a harness adapter?
You can, but it’s harder and riskier. Splicing into factory wires directly can damage factory systems and makes future repairs harder.
Why does my stereo have power but no sound?
Check speaker connections, amplifier remote turn-on, and whether the head unit is set to mute or a mode that disables outputs. Also test speakers directly to isolate the issue.
Is soldering better than crimping for stereo wiring?
Soldering provides a solid, long-term connection but requires skill. Crimp connectors are fast and reliable if done properly with quality connectors.
Conclusion
Wiring a car stereo is a clear, step-by-step process when you know the parts: power, ground, speaker, and remote. Follow the tools, color codes, and safety tips here to get great sound and avoid common mistakes. Try one install on a simple car first, use a wiring harness adapter, and test thoroughly before finishing the dash. If this guide helped, subscribe, leave a comment with your setup, or share your best wiring tip.
