You want a clear, simple way to add a rear camera to your car so backing up feels safer and parking gets easier. Installing one yourself saves money and gives you control over placement, wiring, and display choice. A basic rear camera can be mounted near the license plate, wired to a 12V reverse-triggered power source, and connected to a monitor or head unit for a working backup view.
This guide walks through the tools, steps, and checks you need, and it points out common problems and easy fixes so you avoid surprises. Mechanics and DIYers both will find practical tips that keep the job fast and reliable.
Key Takeaways
- Choose the right camera and display before starting the install.
- Securely mount and wire the camera to the car’s reverse power and ground.
- Test, adjust, and troubleshoot the view to ensure safe backing.
Understanding Rear Camera Systems
A rear camera lets drivers see obstacles, pedestrians, and lane markings behind the vehicle. Key choices include camera type, image features, and whether the camera fits the car’s wiring and monitor.
Types of Rear Cameras for Cars
There are three common types: wired, wireless, and OEM-style integrated units. Wired cameras connect to the car monitor with a video cable. They give steady video and no radio interference but need routing cables through the car.
Wireless cameras send video over a radio link or Wi‑Fi to a monitor. They simplify installation because they avoid long video cables, but they may need a separate power wire and can suffer interference on busy frequencies.
OEM-style cameras replace a factory housing like the license plate light or trunk handle. They match the car’s look and often tie into the factory display and parking guidelines. These usually require vehicle-specific parts and sometimes dealer-level coding.
Features to Consider When Choosing a Camera
Resolution affects clarity. Choose at least 720p for readable details; 1080p gives better license-plate visibility at short range.
Lens angle matters. A 120–170° field of view balances seeing wide areas and minimizing distortion. Ultra-wide lenses show more but can stretch objects at the edges.
Night vision and low-light performance use IR LEDs or large image sensors. Look for cameras listing low lux values (e.g., 0.1 lux) for better dark performance.
Waterproof and temperature ratings (IP67 or higher) ensure durability in rain and cold. Also check for parking guidelines, mirror/reverse image options, and built-in microphone if voice is needed.
Compatibility with Different Car Models
Check power source and trigger method first. Most cameras use 12V and tap the reverse light for automatic activation. Confirm the reverse-light voltage and fuse locations for the specific model.
Match the video output to the monitor input. RCA composite is common on aftermarket displays; some newer cars use RCA plus CAN-bus or LVDS signals needing adapters. For OEM displays, confirm if the car requires a vehicle-specific interface module.
Mounting points differ by model. Universal kits fit at the license plate or bumper. OEM-fit cameras replace trim pieces and may need trim removal tools, special clips, or coding to enable the camera on the vehicle’s head unit.
Tools and Materials Needed
This section lists the specific hand tools, fasteners, and electrical parts needed for a clean, safe rear-camera installation. It focuses on the items a person must have on hand before starting to avoid delays and extra trips to the store.
Essential Installation Tools
A basic toolset keeps the work tidy and fast. The installer will need:
- Screwdrivers: Phillips and flathead, medium and small sizes for trims and connector clips.
- Socket set: 8mm–14mm sockets and a ratchet for license-plate frames, trunk panels, and ground bolts.
- Trim tools: Plastic pry tools to remove interior panels without scratching paint or plastics.
- Wire stripper/crimper: For clean wire ends and secure crimped connections on ring terminals and butt connectors.
- Electrical tape and heat-shrink tubing: Use heat-shrink tubing where possible for moisture resistance; tape for temporary holds.
A multimeter is essential to verify power, ground, and trigger wires before finalizing connections. Optional but very helpful: a flashlight or headlamp, panel clips spares, and cable ties to secure wiring.
Required Wiring and Components
Choose parts that match the camera and vehicle electrical system. Typical components include:
- Rear camera unit with mounting hardware (flush or surface mount). Confirm camera IP rating if exposed to weather.
- Video cable: RCA video cable or a supplied proprietary cable long enough to reach the head unit from the rear. Measure trunk-to-dashboard distance first.
- Power leads: 12V power wire (18–22 AWG for camera), ground wire, and a reverse-trigger lead to tie into the reverse lamp circuit.
- Connectors and terminals: Butt connectors, ring terminals for chassis ground, and quick-disconnects if the camera or harness will be removable.
Use a dedicated power tap or fuse tap at the fuse box when possible. Include an inline fuse (1–5 A depending on camera spec) near the battery or fuse source to protect the camera circuit. Secure all wiring with zip ties and route away from moving parts and heat sources.
| Item | Suggested Spec | Why it matters |
| Video cable | RCA, 6–10 m | Reaches head unit without tight bends |
| Power wire | 18–22 AWG | Enough current capacity for camera |
| Inline fuse | 1–5 A | Protects camera wiring |
| Heat-shrink tubing | Assorted sizes | Seals and insulates splices |
Preparing Your Vehicle for Installation
This step checks power, tools, and the best place to mount the camera. It helps avoid electrical damage and ensures the camera has a clear view and secure fit.
Ensuring Safety and Power Disconnection
They should disconnect the car battery before starting to avoid shorts and accidental airbag triggers. Have a 10 mm wrench or socket ready to remove the negative (black) terminal first, then the positive if needed. Wear safety glasses and insulated gloves when working near the battery.
They must keep metal tools away from battery posts to prevent sparks. If the vehicle has a separate fuse box for accessories, identify the backup light or reverse circuit fuse with the vehicle manual or fuse diagram. Use a multimeter to confirm 0 V on the backup wire before tapping into it.
If replacing trim or accessing taillight housings, they should support the trunk or hatch so it cannot fall. Keep screws, clips, and trim pieces organized in a small tray or labeled bags to avoid losing fasteners during reassembly.
Identifying Mounting Locations
They should choose a mounting spot that gives an unobstructed, level view and keeps wiring short. Common options include above the license plate, integrated into the bumper, or on the rear hatch near the handle. Measure central alignment to ensure the camera points straight back.
Check for thin plastic trim and existing holes behind the chosen area to route the camera cable through the trunk or hatch. Avoid locations that hide the lens behind brackets, exhaust outlets, or tow hitches. If using a license-plate mount, ensure the camera won’t be blocked by a plate frame or lights.
They must confirm there is at least 1–2 inches of flat surface for the bracket and that the mounting screws won’t hit fuel lines or wiring inside the panel. Test-fit the camera and run the cable roughly along the intended path before drilling or final fastening.
Installing the Rear Camera
The installer should position the camera where it gives a clear, centered view and route the power and video cables to the vehicle’s monitor while avoiding moving parts and heat sources.
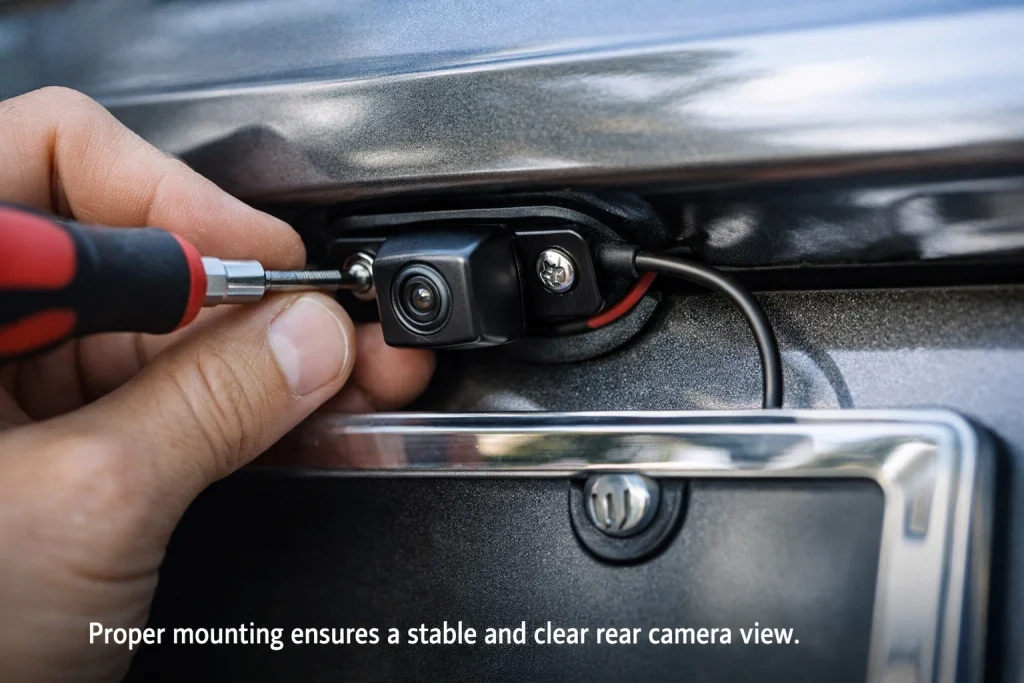
Mounting the Camera Unit
First, choose a mounting spot: commonly above the license plate, inside the tailgate handle, or on the bumper. The chosen spot must be level, free of obstructions, and centered left-to-right for accurate view.
If using a bracket, mark and drill the mounting holes with a drill bit sized for the supplied screws. For a flush or recessed mount, cut the opening carefully and test-fit the camera before final attachment. Use the camera’s rubber gasket or silicone sealant to keep water out of the hole and to prevent vibration.
Tighten the screws evenly so the camera stays aligned. Adjust the tilt before fully tightening to get the desired downward angle—usually 2–5 degrees down is enough for most sedans and SUVs. Finally, clean the lens and check the view on the monitor while the car is stationary.
Running and Securing Wiring
Begin by identifying the camera’s power lead (usually red/black) and the video cable (RCA or a bundled harness). Route the video cable toward the dash using existing grommets or by feeding it through the trunk-to-cabin pass-through. Avoid sharp edges; protect cables with split loom or tape where they pass through metal.
For power, connect the camera’s positive wire to the reverse light positive wire so the camera powers on when the car is shifted into reverse. Ground the camera to a clean metal chassis point. Use butt connectors or solder with heat-shrink tubing for durable connections.
Secure the wiring every 6–12 inches with zip ties and keep it away from exhaust, moving suspension parts, and hot engine components. Finally, test the camera image and reverse activation before reassembling interior panels.
Connecting the Rear Camera to the Display
This section shows how to run the video and power lines from the camera to the car’s display and how to use the reverse light for camera power and trigger. It focuses on connectors, cable routing, and safe electrical taps.
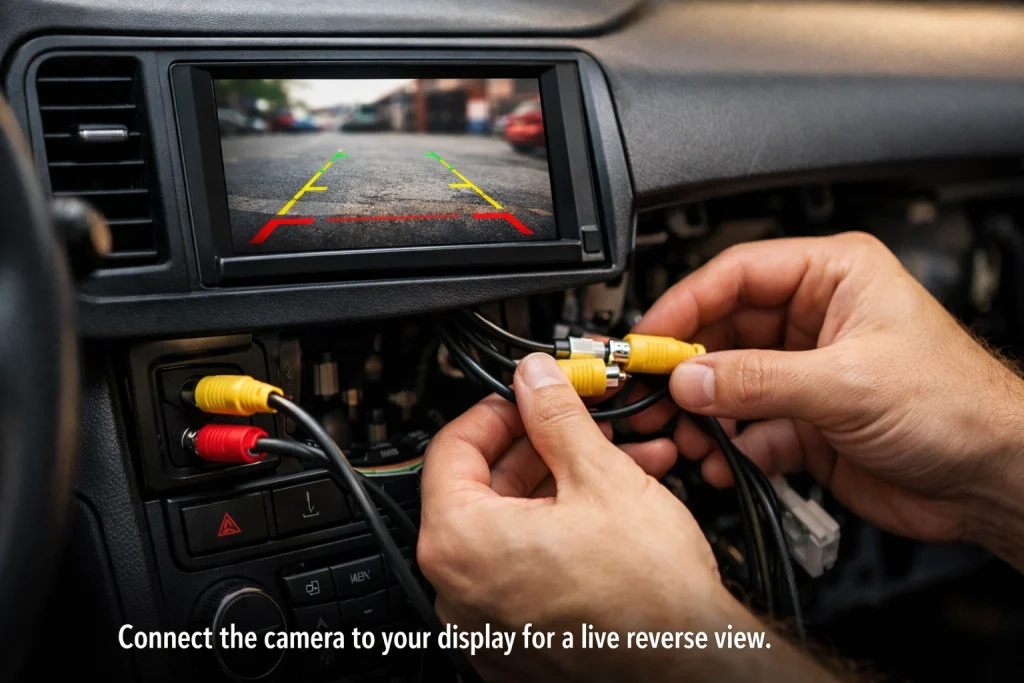
Wiring to the Monitor or Head Unit
Most aftermarket cameras use a single video cable (RCA or a waterproof plug) that runs to the monitor or head unit. He should route the cable through the trunk, under trim panels, and into the dash to avoid pinching. Secure the cable with zip ties every 12–18 inches and keep it away from moving parts and sharp metal.
If the head unit has an RCA video input, connect the camera’s yellow RCA to that input. For OEM-style systems that use a multi-pin harness, match the camera plug to the factory adapter or use a vehicle-specific interface adapter. Test the video connection before reassembling trim by temporarily powering the camera and shifting into reverse to see the image.
Integrating with Reverse Light Power
The camera needs 12V power and a trigger wire that tells the display to switch on when reversing. He should identify the reverse light wire behind the tail light using a multimeter or test light while someone shifts the car into reverse. Tap the camera’s red power lead to the reverse light’s positive wire and ground the camera to a clean chassis ground.
Use solder and heat-shrink or an automotive-grade butt connector for a reliable connection. Add an inline fuse (1–3 A) on the camera’s positive lead near the battery or fuse box to protect the circuit. After wiring, check that the camera only powers when the car is in reverse and that the display switches automatically.
Testing and Calibrating the Camera System

Check that the screen shows a clear, stable image and that the camera’s view lines up with the vehicle’s center. Confirm wiring connections, then make angle and display adjustments so reverse guides match real distances.
Verification of Video Signal and Alignment
They should turn the ignition to accessory or start the engine so the monitor powers on. Put the vehicle in reverse to trigger the camera. Look for a steady image without flicker, color shifts, or static. If the image is distorted, they must re-seat video connectors (RCA or harness) and ground wires, then retest.
They should inspect the view for obstructions like dirt, trim, or loose mounts. The horizon line should be roughly level; if not, the mount needs loosening and repositioning. Use a second person to watch the screen while someone else taps the camera mount to reveal intermittent connection issues.
If the system uses parking guidelines, verify they appear and turn with the steering (for dynamic lines) or stay fixed (for static lines). Note any lag between steering and line movement — more than a second suggests processing or wiring faults that need troubleshooting.
Adjusting Angles and Display Settings
They should start by setting the camera angle so the rear bumper lip and ground at 3–6 feet behind the car are visible. This angle prevents blind spots directly below the bumper while preserving depth perception. Loosen the mounting screws, tilt the camera, then tighten and recheck the view.
On the monitor, adjust brightness, contrast, and color so objects and lines are clear in daylight and low light. Set mirror-image (left/right flip) if the image is reversed. If the camera offers digital zoom or parking grid calibration, follow the manufacturer steps to place the horizontal grid line at the actual bumper level.
Finally, test at slow reverse speeds toward a known object (cone or box) and confirm the displayed distance lines match measured distances. If lines are off, re-run calibration steps or consult the camera manual for software offset adjustments.
Troubleshooting Common Installation Issues
This section covers how to fix blurry or warped images and how to handle problems where the camera shows no picture or won’t power on. It lists the most likely causes and practical fixes to get the camera working correctly.
Solving Image Distortion Problems
If the picture is blurry, first check the lens for dirt, water, or condensation. Clean the lens with a soft microfiber cloth and a small amount of lens cleaner. If condensation forms inside the camera housing, remove the camera and dry it with low heat or leave it in a warm, dry place until clear.
Check the camera angle and mounting. Tighten loose mounts and adjust the angle so the lens points straight back; tilt or twist can stretch or skew the image. Inspect the video cable for kinks or exposed wires; a damaged cable can cause static, lines, or ghosting. Replace the cable if insulation is cracked.
If interference appears as flicker or horizontal lines, route the video cable away from high-current wiring (alternator lines, power cables). Use a ferrite choke on the cable and ensure grounds are solid. If the monitor has image-adjust settings, use them to correct contrast and sharpness.
Addressing No Signal or Power Issues
If the display shows “No Signal,” verify power at the camera. Use a multimeter to check for 12V at the camera’s power wire when reverse gear is engaged. If there’s no voltage, trace the trigger wire from the reverse light to the camera. Repair any broken splices or corroded connectors.
Check all connections: camera power, ground, video RCA or wireless transmitter, and monitor input. Swap cables with a known-good RCA cable to isolate a bad cable. For wired systems, ensure the video connector is fully seated and not bent.
For wireless systems, confirm transmitter and receiver are paired and powered. Move the receiver closer to the transmitter to rule out range issues. If the camera powers but still shows no image, try the camera on another monitor or the monitor with another video source to identify whether the fault is in the camera, cable, or display. For more on wiring and connectors, consult a clear reference like the camera manufacturer’s guide or a general wiring overview on automotive electrical systems.
Maintaining and Caring for Your Rear Camera
Keep the camera clear of dirt, moisture, and physical damage. Run quick checks after heavy weather and inspect mounts and wiring every few months.
Cleaning and Protecting the Lens
They should clean the lens with a soft microfiber cloth and a mild lens cleaner or a 50/50 mix of distilled water and isopropyl alcohol. Spray the cleaner onto the cloth, not directly on the lens, and wipe in gentle circular motions to avoid scratching the glass or plastic cover.
For stubborn grime, use a soft-bristled brush to remove grit before wiping. Avoid household detergents, abrasive pads, and ammonia-based cleaners; those can fog or pit the lens coating. If the camera has a rubber or plastic housing, apply a silicone-based protectant sparingly to seals to keep them flexible.
After washing the car or driving on salted roads, rinse the camera area with fresh water and dry it to prevent corrosion. If the lens develops water spots, repeat the gentle cleaning steps. Replace any scratched or cracked lens covers—they reduce image clarity and let moisture in.
Regular System Checks
They should power on the camera and view the image at least once a month. Check for grainy image, color shifts, flicker, or lines that indicate a failing camera or loose video connection.
Inspect the mount and bracket for rust or looseness. Tighten fasteners and replace corroded screws. Trace the cable from the camera to the monitor; look for abrasions, pinches, or exposed wires, especially where the harness passes through the trunk or tailgate.
Test the reverse-trigger circuit by shifting into reverse and confirming the monitor switches automatically. If the feed drops when the car moves or in cold weather, check ground connections and replace any brittle wiring. Keep spare mounting hardware and a small roll of electrical tape or heat-shrink tubing in the glove box for quick repairs.
FAQS
What tools does one need to install a rear camera?
Common tools include screwdrivers, wire strippers, electrical tape, a multimeter, and a drill if mounting holes are required. A trim pry tool helps hide wiring without damaging panels.
How long does installation usually take?
A typical DIY install takes 1–3 hours depending on the car and experience. Complex wiring or routing through tight panels can add time.
Can a person install a wireless camera instead of a wired one?
Yes. Wireless systems avoid long video cables but still need power wires for the camera. Wireless signals can be affected by metal or interference, so placement matters.
Will installation affect the car’s warranty or electronics?
If someone taps into factory wiring or damages airbags and harnesses, it could affect warranty or safety systems. Following the vehicle manual and avoiding airbag cables reduces risk.
How does one hide the wiring cleanly?
Use existing wiring channels, run wires under trim, and secure with zip ties and clips. A clean route avoids pinching wires and keeps the interior tidy.
What if the camera picture is upside down or blank?
Check camera mounting orientation and video connections first. Use a multimeter to verify power to the camera and confirm the display input matches the camera type (NTSC/PAL for some systems).
Is professional installation recommended?
They recommend professional help for complex vehicles, factory integration, or when unsure about airbag and CAN-bus wiring. Professionals can ensure a safe, neat result.
Conclusion
Installing a rear camera gives a car better rear visibility and helps reduce backing risks. The steps are simple: choose the right camera, mount it securely, wire it to power and the monitor, and test the system.
They should take their time with wiring and connections. A clean installation avoids shorts and loose connections that cause failures later.
If the project seems too hard, a professional can finish the job quickly and safely. They should compare costs and warranty options before deciding.
Maintenance is minimal. Regularly clean the lens and check connections after heavy weather or car washes.
A basic checklist helps keep the task on track:
- Pick camera type and mount location.
- Route cables away from moving parts.
- Connect power to reverse or fuse-protected source.
- Test image and adjust angle.
Following these steps gives a reliable backup camera that improves safety and parking confidence.


