You want a backup camera that makes reversing safer and easier, and you want to know how to pick and install one without getting lost in tech jargon. This guide shows which camera fits your vehicle, how to install it step-by-step, and what to check so it works reliably. The tips come from practical experience and clear explanations so you can act with confidence.
You will learn the real benefits and limits of backup cameras, simple wiring and mounting methods, and basic upkeep to keep the system working. Ethan Caldwell’s battery and electrical tips appear where they help you avoid power and grounding problems during installation.
Key Takeaways
- Choose a camera type that matches your vehicle and viewing needs.
- Follow clear installation steps and verify power and ground connections.
- Maintain and test the system regularly to ensure reliable performance.
Understanding Backup Camera Technology
Backup cameras show a view behind the vehicle on a screen, help reduce blind spots, and add safety when reversing. They vary by connection type, mounting, and image features that affect clarity and installation.
How Backup Cameras Work
A backup camera uses a wide-angle lens to capture the area behind the vehicle and sends that video to a display. It usually powers on when the driver shifts into reverse using a trigger wire or a signal from the vehicle’s reverse circuit.
Most systems include a small waterproof camera, a video cable or wireless transmitter, and a monitor or a head unit display. The camera’s image may include parking guidelines. These lines are either fixed or generated by a system that reads steering angle.
Night vision relies on low-light sensors or infrared LEDs around the lens. Image quality depends on resolution, lens quality, and exposure control. Low latency matters: delays can make judging distances harder, so wired systems tend to be more responsive than some wireless setups.
Types of Backup Camera Systems
Wired systems run a video cable from camera to display and give stable, low-latency video. They require routing cable through the vehicle, which takes more time to install but reduces interference.
Wireless systems send video over radio to a receiver at the display. They simplify installation and are common for trailers and aftermarket kits, but signal dropouts or interference can occur, especially with metal trailers or long distances.
Battery-powered and battery-backed cameras mount without vehicle power and suit trailers or temporary use. Integrated OEM cameras are built into the bumper or tailgate and often tie into parking sensors and vehicle systems. Each type trades off between ease of install, reliability, and video consistency.
Key Features to Consider
Resolution and sensor size affect clarity; higher resolution (720p or 1080p) gives clearer images for judging distance. Field of view matters: 120–180 degrees covers more area but can distort distance, while narrower lenses reduce distortion.
Weather resistance rating (IP67 or higher) ensures the camera survives rain and road spray. Night performance stems from low-light sensitivity and IR LEDs; look for good low-light specs rather than just LED count.
Other practical features: parking guidelines (fixed or dynamic), trigger wiring options, delay/latency specs, and mounting style (flush, surface, or license-plate). Compatibility with the vehicle’s display or an aftermarket monitor and the ease of routing power and video cables are key installation considerations.
Selecting the Right Backup Camera
Choose a camera that fits the vehicle and the driver’s needs. Focus on mounting style, power source, image quality, and whether the vehicle already has a compatible display.
Compatibility With Vehicles
They must check mounting points first: license-plate, bumper, or flush-mount locations are common. Trucks, vans, and RVs often need higher-mounted or wide-angle cameras to cover tall hitches and blind spots. Small cars can usually use a simple license-plate camera.
Power and video connections must match the vehicle. Most cameras use a 12V power feed; confirm accessory or reverse-light power is available. If the vehicle has a factory display, verify the input type—RCA composite, AHD, or a specific vehicle interface adapter. For vehicles with factory infotainment, a CAN-bus or video interface module may be required.
Consider the field of view and night vision. Wider angles (120–180°) show more but can distort distance. Look for cameras with IR LEDs or low-light sensors for dark conditions. For trailers, many choose a separate camera mounted on the trailer or a camera with a tow-hitch bracket.
| Vehicle Type | Recommended Mount | Key Check |
|---|---|---|
| Small car | License-plate | Check 12V reverse power and screen input |
| Truck / RV | Bumper or high-mount | Wide field of view and weather rating |
| Trailer | Hitch or trailer frame | Separate camera on trailer or wireless link |
Wired vs. Wireless Options
Wired systems use a physical video cable between the camera and display. They give the most stable image with low latency. Wired installs require routing cable through the vehicle, which can take 1–3 hours for a DIY job. Choose shielded RCA or digital cables to reduce interference.
Wireless systems transmit video over radio or Wi‑Fi to a receiver or display. They cut install time and avoid a long cable run. Expect occasional dropouts, interference from other Wi‑Fi devices, and slightly higher latency. Battery-powered wireless cameras simplify mounts but need frequent recharging or solar charging.
Consider reliability and range. Wired suits drivers who tow heavy loads or need constant, crisp video. Wireless works best for temporary trailer hookups or vehicles where running a cable is impractical. Compare specs: transmission range, video resolution, latency, and night-vision performance before buying.
Installation Basics
This section explains what tools and parts are needed and the step-by-step actions to mount, wire, and power a backup camera. It highlights safety checks, common wiring points, and tips to get a clear image and reliable trigger.
Essential Tools and Materials
List the parts first: backup camera (wired or wireless), monitor or mirror display, power wire kit, RCA or video cable (for wired kits), mounting hardware, and a fuse tap or wire connectors.
Gather these tools: Phillips and flathead screwdrivers, wire strippers, crimping tool, multimeter, electrical tape, zip ties, and a drill with small bits. A panel removal tool helps pry trim without damage.
Choose wires sized for low-voltage accessory use (18–22 AWG for signal, 14–16 AWG for power depending on load). Use heat-shrink tubing for waterproof joins. If the kit includes a trigger wire, plan to tap the reverse light positive. For wireless kits, check antenna placement and interference.
Step-by-Step Installation Process
Start by locating the best camera mounting spot: center of the rear bumper or above the license plate. Clean and test-fit the camera, then mark holes. Drill only where plastic or metal without hidden wiring exists.
Run the camera cable from the mount into the trunk or tailgate. Use grommets for holes and protect exposed wires with split loom tubing. Route the cable under trim panels to the cabin, using panel tools to avoid clips damage.
Connect power to the reverse light positive and ground to a clean metal point. For wired video, plug RCA into the monitor and test image before finalizing. For wireless, pair the transmitter and receiver, then check signal and image quality.
Secure all wiring with zip ties and tuck excess slack. Reinstall trim panels and test the camera in low and bright light. Verify the trigger engages when shifting to reverse and adjust camera angle for a level horizon and useful field of view.
Safety Benefits and Limitations
Backup cameras cut down blind spots behind a vehicle and give a clearer view of low obstacles. They also change how drivers check behind them, which can help or harm safety depending on use.
Preventing Blind Spots
A backup camera shows the area directly behind the vehicle that mirrors miss. It reveals low objects like curbs, toys, or pets that sit below mirror sightlines. Many cameras include distance lines or sensors that warn when the vehicle gets close to an object.
Drivers should still perform shoulder checks and use mirrors. Cameras can have blind zones at the far edges and may not show fast-moving objects approaching from the side. Dirt, rain, snow, or glare can obscure the lens and reduce visibility. Regular lens cleaning and sensor maintenance keep the camera reliable.
Improving Driver Awareness
Backup cameras make reversing more precise, helping drivers steer straight into parking spaces and avoid small obstacles. They can reduce minor backing collisions, particularly in crowded driveways and parking lots.
Relying only on the screen can reduce habitually looking around. Drivers must combine camera views with mirrors and direct sight to confirm surroundings. Night vision or low-light performance varies by model, so drivers should test their camera in dim conditions to know its limits.
Using Your Backup Camera Effectively
This section explains how to read the camera image and how to use it for tight parking and low-speed maneuvers. It focuses on the screen lines, object distance, and simple steps to move safely.
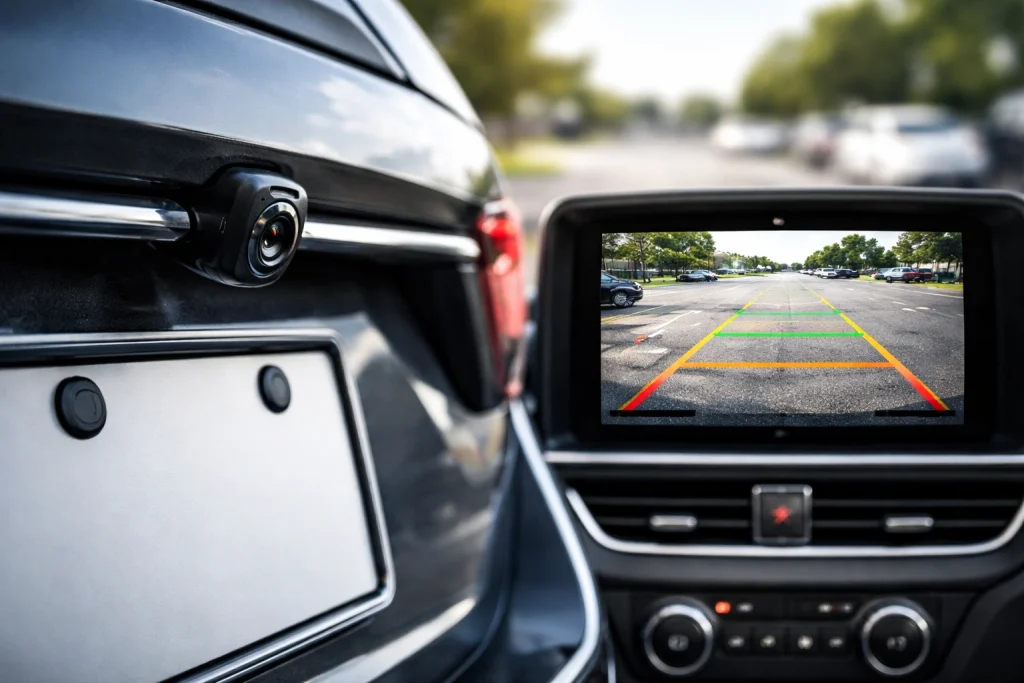
Interpreting Visual Guides
Most cameras show colored guide lines: green, yellow, and red. Green means clear space, yellow warns to slow, and red means stop or check immediately. Some systems add center or trajectory lines that move with the steering wheel; use those to judge the car’s path.
Camera images can distort distance. Small objects close to the bumper may look farther away. Always look for object size and relative position, not just where the lines cross the object.
If the screen has a top-down or multi-view mode, switch to it for tight spots. Clean the lens often; dirt and water blur the image and hide hazards.
Tips for Parking and Maneuvering
Use the backup camera alongside mirrors and shoulder checks. The camera shows directly behind the vehicle but not the sides or blind spots. Combine mirror checks with the camera before backing into a parking space.
Move slowly and make small steering adjustments. When parallel parking, align the trajectory line with the curb and back in short bursts. For perpendicular spots, center the vehicle using the center guide and stop when the rear red zone nears the curb or line.
Rely on audible sensors if available; they give distance cues the camera image can’t. Adjust camera settings if lines look off—consult the vehicle’s menu to recalibrate or turn guidelines on and off.
Care and Maintenance
Routine care keeps the camera clear and the system reliable. Simple cleaning, quick checks, and timely updates prevent most problems and extend the camera’s life.
Cleaning and Troubleshooting
They should clean the lens weekly or after driving in rain, mud, or snow. Use a microfiber cloth and mild soapy water. Avoid ammonia or abrasive cleaners that can damage coatings. For stubborn grime, soak a cloth in warm water for a minute before wiping.
They must inspect the mounting and wiring monthly. Look for loose screws, cracked housing, or exposed wires. If the image flickers or drops out, test the power and ground at the camera with a multimeter. Swap the video cable with a known-good cable to isolate a bad lead.
Fogging or condensation inside the lens means the seal has failed. They should remove the camera and let it dry in a warm, shaded place; replace the unit if moisture returns. Keep the camera’s field of view clear of aftermarket accessories and bumper stickers that can block critical sightlines.
Firmware and Software Updates
They should check the camera or monitor maker’s website for firmware updates every 3–6 months. Updates can fix image errors, improve night-view processing, and add compatibility with new monitors. Download updates only from the manufacturer’s official support page to avoid corrupted files.
When updating, connect the monitor or camera to a stable power source and follow the exact steps in the manual. Back up any saved settings first. If an update fails, do not power-cycle repeatedly; contact support or use the recovery procedure in the manual.
For app-connected systems, they must keep the phone app current. Grant only necessary permissions and remove old paired devices to prevent connection conflicts. For more on firmware basics and versioning, readers can see the general explanation on firmware.
Legal Considerations and Regulations

Many countries require backup cameras on new vehicles to improve safety. In the United States, federal standards now mandate rearview cameras on most new cars and light trucks built after 2018. This rule aims to reduce back-over accidents involving pedestrians and obstacles.
Owners of older vehicles usually do not have to retrofit a camera to meet the law. However, local or state rules may affect commercial vehicles, modified rigs, or vehicles used for hire. They should check specific regulations that apply to their use and region.
Manufacturers must meet technical specs for field of view and image quality. These standards ensure the camera shows a wide area directly behind the vehicle. Drivers should still rely on mirrors and direct checks; cameras supplement but do not replace safe backing practices.
Privacy and data rules may apply when cameras record or stream footage. Businesses that store or share recorded video should follow local data-protection laws. Individuals should avoid placing cameras where they capture private areas beyond the vehicle’s immediate rear.
Practical checklist:
- New car buyers: Verify the camera works before purchase.
- Owners of older cars: Consider aftermarket cameras for safety, not because of legal need in most cases.
- Fleet operators: Confirm compliance with both vehicle and data laws.
Expanding Your System
This section shows practical ways to connect a backup camera to other vehicle systems and how to pick a better display. It focuses on which parts to check, how connections work, and what to expect from each upgrade.
Integrating With Other Safety Features
They can tie a backup camera into parking sensors, blind-spot monitors, or a vehicle’s onboard computer. For wired parking sensors, the camera’s trigger wire should link to the reverse light circuit so the camera and sensors activate together. When adding sensors, mount them at recommended heights (usually 18–24 inches) and test sensor distances after installation.
For blind-spot systems, choose modules that accept video input or send alerts to the same display. If the vehicle has a CAN bus, use a compatible interface adapter to share speed, gear, and turn-signal data with the camera unit. This lets the display show dynamic guide lines or automatic switching based on gear. Have a professional verify CAN connections if the user is unsure.
Ensure grounds are tight and fused power lines protect accessories. After integration, drive slowly in a safe area to test alarms, camera triggers, and guide lines under real conditions.
Upgrading Display Screens
They should match the camera signal and mounting style. Check whether the camera outputs NTSC/PAL or digital (AHD/HD) and pick a monitor that accepts that format. For dashboard mounts, measure dash depth and bezel size before buying to avoid fit problems.
Consider screen size and resolution for clarity at different viewing angles. A 7–9 inch 720p screen often balances space and detail for cars and small trucks. For larger vehicles or split-screen needs, choose a wider 10–12 inch or a headrest/overhead monitor. Touchscreens add menu control but may need extra power and wiring.
If the vehicle has a factory infotainment system, use a video input adapter or an HDMI/VGA converter rather than altering the factory head unit. Test video latency and night-mode brightness in low light before finalizing the install.
FAQS
What types of backup cameras are available and which is best?
They can choose wired, wireless, or mirror-integrated cameras. Wired models give the most reliable video. Wireless ones are easier to install but may face interference.
How hard is installation for a beginner?
A person with basic tools and patience can install many cameras. Wired installs need running cables through the car; that takes more time and care.
Where should the camera be mounted?
Most mount on the rear bumper or above the license plate for a clear, centered view. Higher mounts give a wider field; lower mounts show the ground close to the vehicle.
How is the camera powered and triggered?
Cameras usually draw power from the reverse light circuit so they turn on when the vehicle reverses. Some systems offer constant power or separate switches for different behavior.
Will a backup camera work at night or in bad weather?
Many cameras include night vision LEDs and weatherproof housings with an IP rating. Night visibility varies by model; check specs like low-light performance and IP rating.
Does a camera need a special screen or head unit?
Some cameras connect to aftermarket head units, rearview mirror monitors, or standalone displays. They can also connect to an existing factory screen with the right adapters.
What maintenance does a backup camera need?
They need occasional cleaning and checks for loose wiring or corrosion. Promptly replace damaged mounts or seals to keep the image clear and the unit weatherproof.
Conclusion
A backup camera gives drivers better rear visibility and helps reduce the risk of low-speed collisions. It does not replace mirrors or checking blind spots, but it adds another layer of safety that is especially useful in tight spaces and crowded areas.
They can choose wired or wireless systems based on skill level, budget, and vehicle type. Wired systems are more stable; wireless ones are easier to install. Proper planning, correct wiring, secure mounting, and routine checks make any installation safer and longer lasting.
If a DIY route feels too hard, a professional installer can save time and prevent wiring mistakes. For those who do install it themselves, following step-by-step guides, using the right tools, and testing the system before regular use prevents most common problems.
Maintenance is simple: keep the lens clean, check connections, and update or replace parts when the image degrades. Small checks every few months keep the camera reliable and extend its life.
A clear, correctly installed backup camera helps drivers make safer decisions while reversing. With patience and care, most beginners can install and maintain a system that adds real value to their vehicle.

