Quick Answer: To secure a phone holder on your dashboard, clean the surface with isopropyl alcohol, choose a flat low-texture spot, use the right adhesive pad or suction disc for your dash material, press firmly, and let it cure before driving. Most mounts fail because of poor prep, rough surfaces, heat, or bad placement.
I have installed a lot of phone mounts in daily drivers, work trucks, and family SUVs, and the same problems come up again and again. The holder is stuck to a dusty dash. The surface is too textured. The phone is too heavy for the mount. Or the adhesive gets baked in summer heat.
I’m Michael Reynolds, and I like simple fixes that hold up in real driving. In this guide, I’ll walk you through the right way to secure a dashboard phone holder, what usually goes wrong, and how to make the mount stay solid on rough roads, hot dashboards, and long trips.
What Does It Mean to Secure a Phone Holder on a Dashboard?
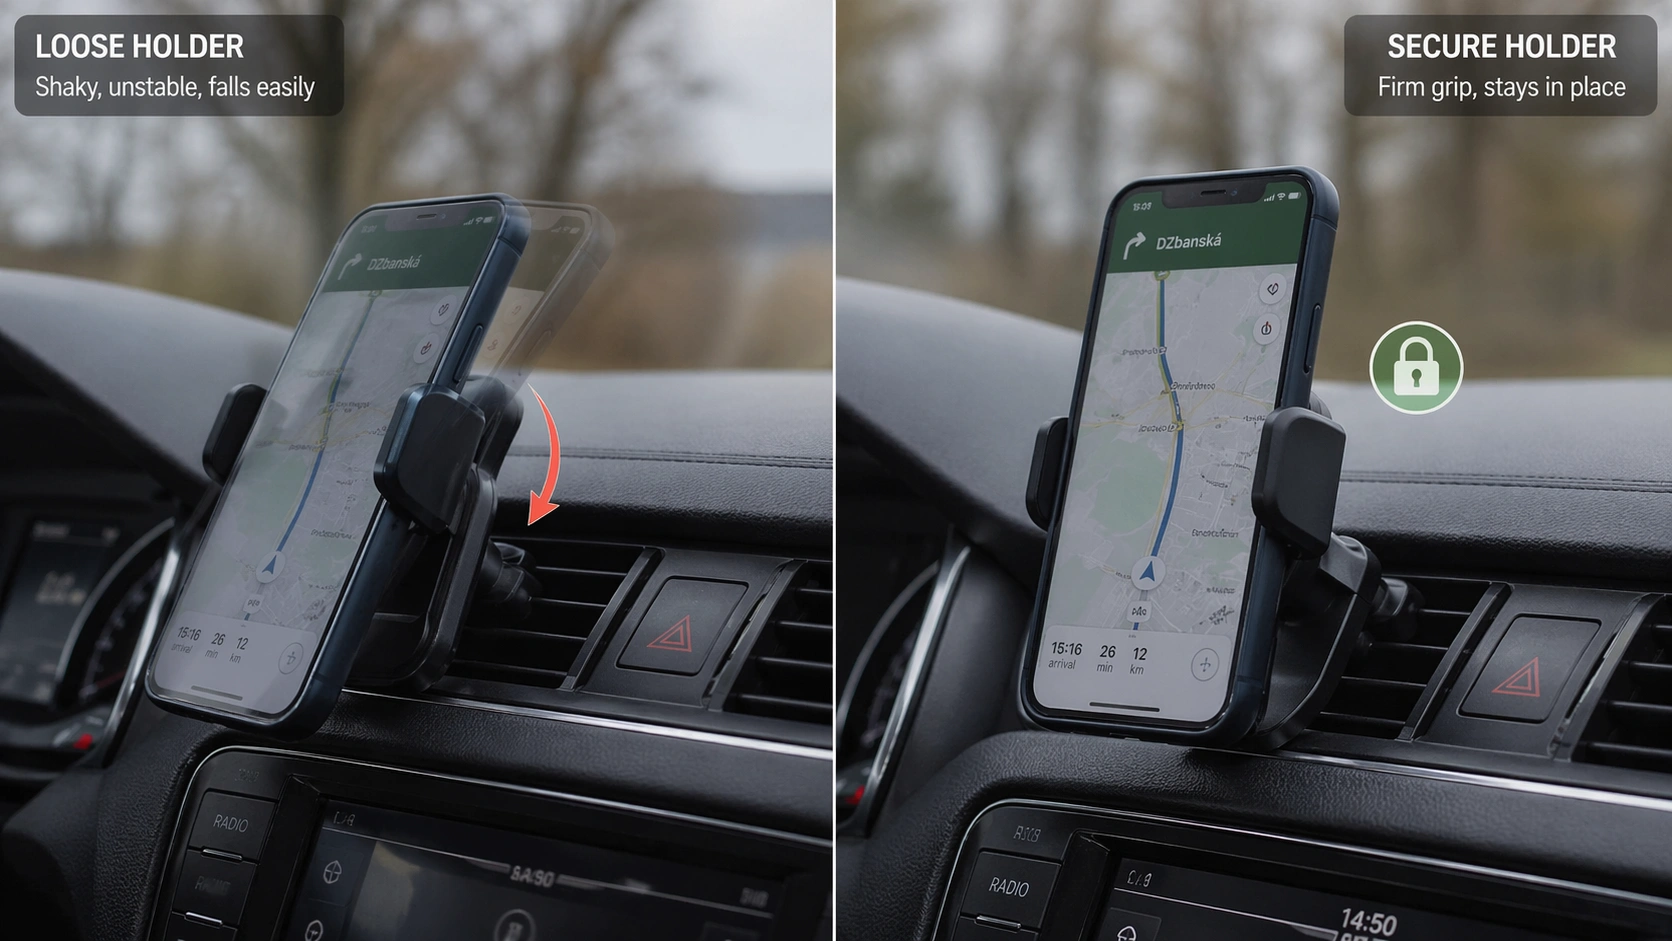
Securing a phone holder on a dashboard means the mount base stays attached, the arm stays stable, and the phone stays in place without wobbling, sagging, or falling off. A good setup should handle turns, bumps, braking, heat, and daily use without constant readjustment.
It also means the mount is placed where you can glance at navigation without blocking your road view. A phone holder that sticks well but sits in the wrong place is still a bad install.
Why It Matters
A loose phone mount is more than annoying. It can turn into a distraction fast. If your holder drops mid-drive, you look down, reach across the dash, and take your attention off the road.
A secure dashboard mount keeps the phone where you expect it. That makes navigation easier to read, reduces bounce, and helps you keep both hands where they belong.
How a Dashboard Phone Holder Stays Secure
A dashboard phone holder usually depends on four things. First, the dash surface has to be clean. Second, the mount base has to match the dashboard material. Third, the holder needs enough contact area and enough pressure during installation. Fourth, the adhesive or suction base needs time to set before you hang the phone on it.
| Factor | Why It Matters | What Happens If You Ignore It |
|---|---|---|
| Surface prep | Removes dust, oils, and interior dressing | Mount peels off early |
| Dashboard texture | Affects how much of the base actually touches the dash | Weak bond and edge lifting |
| Heat resistance | Summer heat can soften cheap adhesive | Mount slides or drops in hot weather |
| Mount design | Long arms and heavy phones create extra leverage | Shaking, sagging, or base failure |
| Curing time | Lets adhesive reach full strength | Bond weakens before it fully sets |
Basic Explanation: Which Dashboard Mount Type Works Best?
Not every dashboard phone holder uses the same mounting method, and that matters a lot. Some work better on smooth plastic. Others need a disc pad. Some are great for light phones but struggle with large phones in thick cases.
| Mount Type | How It Attaches | Best For | Watch Out For |
|---|---|---|---|
| Adhesive dashboard mount | Sticky base or adhesive plate | Clean, fixed installation | Can fail on rough or dusty dashboards |
| Suction mount with dash disc | Suction cup onto smooth adhesive disc | Drivers who want repositioning | Needs a smooth disc or very smooth surface |
| Magnetic dashboard mount | Adhesive or suction base plus metal plate on phone | Fast on-and-off use | Weak magnets can struggle with heavier phones |
| Clamp-style dashboard mount | Adhesive or suction base with gripping cradle | Large phones and thicker cases | Bulkier than magnetic mounts |
| Friction pad dashboard holder | Weighted or grippy base sits on dash | Temporary placement | Can slide during hard turns or hot weather |
What You Need Before You Start
You do not need a full toolbox, but using the right materials makes a big difference. I keep this setup simple.
| Item | Why You Need It | Optional or Required |
|---|---|---|
| Phone holder or mount | Main mounting system | Required |
| Isopropyl alcohol | Cleans the surface before mounting | Required |
| Lint-free cloth | Wipes the dash without leaving fibers | Required |
| Dashboard adhesive disc | Creates a smooth base on textured dashboards | Optional but often helpful |
| 3M VHB mounting tape | Upgrades weak or worn factory adhesive | Optional |
| Plastic trim card | Helps remove old adhesive cleanly | Optional |
How to Secure a Phone Holder on Dashboard Step by Step
1. Pick the right mounting spot
Start by choosing the location before you peel any backing. The best spot is usually a flat area with low texture that is easy to glance at but does not block the windshield or important controls. I also make sure the phone will not interfere with the shifter, climate controls, or screen buttons.
| Placement Area | Good Idea? | Why |
|---|---|---|
| Center dash, low and flat | Usually yes | Good balance of visibility and stability |
| Top of dash near windshield | Sometimes | Easy to see, but hotter and more likely to block view |
| Far side of dash | Usually no | Harder to reach and easier to ignore until it falls |
| Curved dash edge | No if possible | Poor contact area and more leverage on the base |
| Over an airbag cover or seam | No | Unsafe and unstable |
2. Clean the dashboard thoroughly
This is the step people rush, and it is the reason many mounts fail. Wipe the exact mounting area with isopropyl alcohol. Let it dry fully. If the dashboard has old dressing, silicone cleaner, or sticky residue, clean it again.
If I can still feel slickness with a fingertip, I do not mount yet. The base needs a clean, dry, non-oily surface.
3. Test-fit the mount
Hold the mount in place with the phone attached before installing it. Check the angle. Make sure the phone screen clears the dash and does not hit the windshield. Also check that charging cables can connect cleanly if you use wired charging.
4. Decide whether you need a dashboard disc
If the dashboard is rough, pebbled, soft-touch, or sharply curved, a direct stick-on mount may not hold well. That is when a dashboard adhesive disc helps. The disc gives the mount a smoother and more stable platform.
| Dashboard Surface | Direct Adhesive Mount | Disc Pad Recommended? |
|---|---|---|
| Smooth hard plastic | Usually works well | Not always |
| Light texture | Sometimes works | Often helpful |
| Heavy texture | Usually weak | Yes |
| Soft-touch dash | Can be inconsistent | Usually yes |
| Curved dash panel | Depends on base size | Often yes |
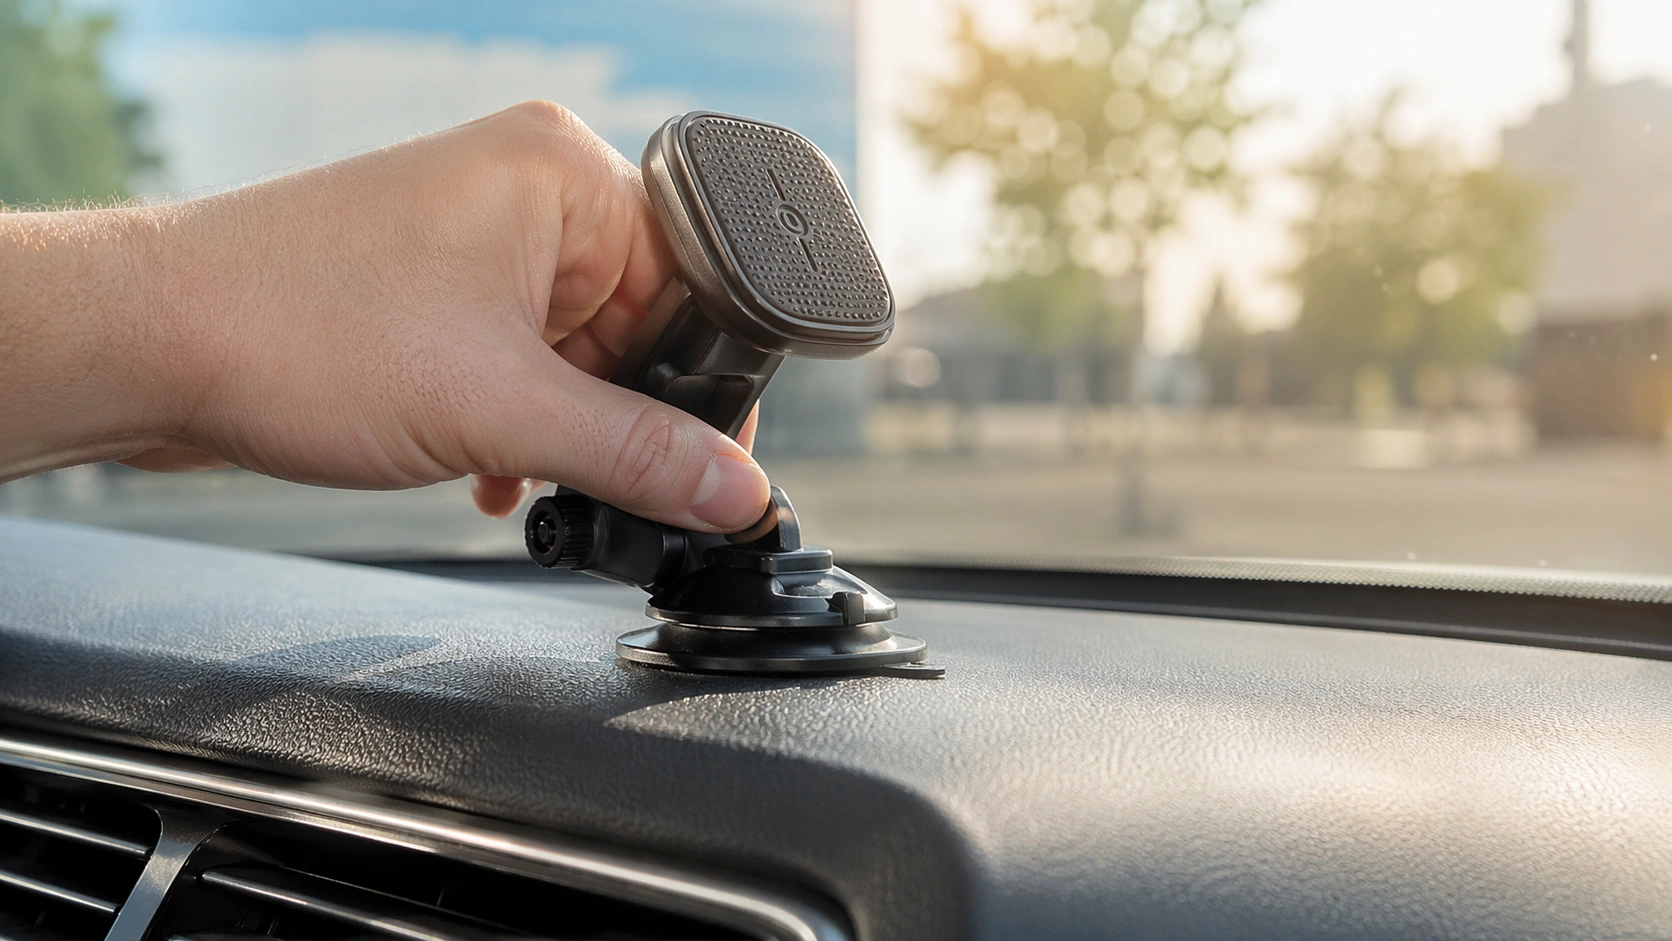
5. Apply the mount correctly
Peel the backing, line it up carefully, and press straight down. Do not stick it, peel it back, and try again with the same adhesive. Once the base touches the dash, I apply firm pressure for 30 to 60 seconds so the adhesive has the best possible contact.
If you are using a suction cup with a locking lever, press the cup down first, then engage the lock fully. If you are using a disc plus suction mount, let the disc cure before attaching the suction cup if the manufacturer recommends it.
6. Let it cure before you use it
This step matters more than people think. Do not clip in the phone right away. Even if the mount feels secure, the adhesive is still setting. I like to wait several hours at a minimum. Overnight is even better if you want the strongest bond.
7. Test it on a short drive first
Use the mount without aggressive driving at first. Look for signs of trouble like slow lifting at the edges, wobble at the arm joints, or a base that starts to tilt under the phone’s weight.
Why Dashboard Texture, Heat, and Phone Weight Matter
The mount base only holds as well as the dashboard lets it. A smooth dash gives the adhesive or suction cup a better seal. A rough dash creates tiny gaps. Then heat adds another problem by softening cheap adhesive and making the bond weaker.
Phone size also matters. A heavy phone with a thick case puts more strain on the base, especially if the mount uses a long arm. The farther the phone sits from the dashboard, the more leverage it creates over bumps.
| Condition | Effect on Mount | Best Response |
|---|---|---|
| Rough dashboard texture | Reduces contact area | Use a smooth adhesive disc |
| Hot summer cabin | Softens weak adhesive | Use better tape and avoid the hottest spots |
| Heavy phone | Pulls forward on the base | Use a stronger cradle-style mount |
| Long extension arm | Increases vibration and leverage | Choose a shorter, more rigid arm |
| Cold installation day | Can slow adhesive grip | Install in moderate temperature when possible |
Common Problems and Fixes
| Problem | What It Usually Means | What I Do to Fix It |
|---|---|---|
| Mount falls off after a day or two | Dirty dash, weak adhesive, or not enough curing time | Remove it, clean again, use fresh adhesive or a disc pad, and reinstall |
| Phone holder shakes while driving | Mount arm is too long or joints are loose | Shorten the arm, tighten the joints, or switch to a sturdier mount |
| Suction cup keeps letting go | Surface is too rough or seal is poor | Use a dashboard disc or move the base to a smoother surface |
| Mount tilts forward with phone installed | Phone is too heavy for the design or angle is poor | Use a heavier-duty cradle mount and move it to a flatter area |
| Adhesive turns soft in summer | Low-quality glue or too much sun exposure | Upgrade the adhesive and avoid the top hottest part of the dash |
| Sticky residue stays on the dashboard | Old adhesive broke down | Lift residue gently and clean the area before reapplying anything new |
| Magnetic mount feels weak | Weak magnet, poor metal plate placement, or heavy phone | Use a stronger magnet mount or switch to a clamp mount |
Common Mistakes to Avoid
- Sticking the mount to a dusty or shiny dashboard without cleaning it first
- Installing the mount on a sharply curved or deeply textured area
- Using the phone holder immediately instead of letting the adhesive cure
- Choosing a lightweight mount for a large heavy phone
- Using a suction cup directly on rough dash plastic
- Mounting too high and partially blocking the road view
- Ignoring heat if the vehicle sits outside all day
- Trying to reuse old adhesive that has already failed once
Pro Tips and Best Practices
When I want a dashboard phone holder to stay put for the long term, I follow a few simple rules. I pick the flattest spot I can find. I avoid long flexible arms unless the phone is light. I let the adhesive cure overnight when possible. And if the dashboard is rough, I do not fight it. I use a disc pad from the start.
- Choose a low-profile mount for better stability on bumpy roads
- Use a clamp-style holder if your phone is heavy or always in a thick case
- Install the mount when the cabin is not freezing cold or blazing hot
- Check joint tension after the first day of driving
- Keep the phone close enough for navigation, but never high enough to block your line of sight
- If the base slips even a little, fix it early before it fully fails
Best Mounting Option by Use Case
| Use Case | Best Mount Style | Why It Works |
|---|---|---|
| Daily commuting | Adhesive dashboard mount | Stable and simple once installed correctly |
| Rideshare or delivery driving | Clamp-style mount with strong base | Handles frequent phone removal better |
| Hot climate driving | Dashboard disc plus quality suction or strong adhesive base | Better heat performance than weak stock adhesive |
| Textured dashboard | Disc pad with suction mount | Creates a smooth sealed surface |
| Heavy phone with thick case | Cradle or clamp mount | More secure than small magnetic mounts |
| Short-term temporary setup | Friction pad holder | Easy to move, though less secure |
Tool Recommendations
These are the kinds of products I look for when I want a secure dashboard setup. I care more about stable mounting, heat resistance, and easy real-world use than flashy design.
| Product | Why It Helps | Best For |
|---|---|---|
| iOttie Easy One Touch Dashboard & Windshield Mount | Solid one-hand use, strong base design, and wide phone compatibility | Drivers who want an easy everyday mount |
| 3M VHB Mounting Tape | Useful for replacing weak adhesive on a mount base | Fixing a mount that will not stay stuck |
| Dashboard Adhesive Pad Disc | Creates a smoother mounting surface on rough dashboards | Textured or curved dashboards |
iOttie Easy One Touch Dashboard & Windshield Mount
A practical choice for drivers who want quick one-hand mounting and a stable everyday setup.
3M VHB Mounting Tape
This is one of the simplest upgrades when the factory adhesive on a phone holder base is not strong enough.
Dashboard Adhesive Pad Disc for Phone Mounts
If your dash is rough or pebbled, this can be the missing piece that finally makes the mount hold.
Dashboard Adhesive Mount vs Suction Mount vs Vent Mount
Even though this article is about securing a phone holder on the dashboard, many drivers are really deciding between a few different mount styles. This table makes the choice easier.
| Mount Style | Stability | Ease of Installation | Works on Textured Dash? | Best Choice For |
|---|---|---|---|---|
| Adhesive dashboard mount | High if installed correctly | Moderate | Sometimes | Drivers who want a clean fixed setup |
| Suction mount with dashboard disc | High | Moderate | Yes, with disc | Drivers who want repositioning flexibility |
| Vent mount | Medium | Easy | Not relevant to dashboard texture | People who do not want anything stuck to the dash |
| Friction pad mount | Low to medium | Very easy | Yes | Short-term or rental car use |
Helpful Resources
- NHTSA: Distracted Driving
- AAA: Distracted Driving Information
- 3M: Adhesive and Surface Prep Resources
FAQ
Why does my phone holder keep falling off the dashboard?
Most of the time, the surface was not cleaned well enough, the dashboard is too textured, or the adhesive did not get enough time to cure before the phone was attached.
Can I use a suction cup phone mount on a textured dashboard?
Usually not by itself. A suction cup works much better on a smooth dashboard disc or another flat sealed surface.
What is the best way to secure a phone mount on a hot dashboard?
Use a better quality mount, clean the area well, avoid the hottest high points on the dash, and use a heat-resistant adhesive pad or dashboard disc if needed.
How long should I wait before using a newly installed phone holder?
A few hours is the minimum I recommend, but overnight is better if you want the adhesive to reach a stronger hold.
Is mounting tape better than the adhesive that comes on the phone holder?
It can be. If the factory adhesive is weak, old, or damaged, a stronger mounting tape can improve the bond a lot.
Where should I place a phone holder on the dashboard?
Pick a flat area that is easy to see but does not block your view of the road, important controls, or airbag zones.
Will a dashboard phone holder damage the dashboard?
It can if the adhesive is poor or the holder is removed roughly. Using a quality pad and removing it carefully reduces the chance of marks or residue.
Conclusion
If you want to know how to secure phone holder on dashboard the right way, it comes down to good prep, smart placement, and using the right base for your dashboard surface. Clean the spot, match the mount to the dash, give the adhesive time to set, and do not overload a weak holder with a heavy phone.
Get those basics right, and your phone mount stops being something you fight with every week. It becomes a simple part of your daily drive.
About Michael Reynolds
I’m Michael Reynolds, and I focus on practical automotive fixes that drivers can actually use. When it comes to phone mounts and in-car accessories, I care about secure placement, clean installs, vibration control, and how products hold up in real heat, rough roads, and everyday driving. My goal is always the same: simple advice that works the first time.

